This article is part of the series related to mastering the DP-600 certification exam: Implementing Analytics Solutions Using Microsoft Fabric
Table of contents
To be honest, I can’t remember that one Power BI feature caused so much hype as the Fields parameter, even though it was introduced exactly 2 years ago (May 2022)! I firmly believe that the Fields parameter is one of the things that will forever change the way we are building user experience in Power BI.
One important disclaimer before we jump into the action: Field params is still a preview feature. That means, don’t be surprised if you open Power BI Desktop and you don’t see an option to use Field params. You first need to enable this feature under Options & Settings -> Options -> Preview features.

I’ve already written about how you can leverage Field parameters to bring more life into your Power BI reports, or how to dynamically filter the data by leveraging Field parameters as a semantic model feature.
Additionally, there are some very creative use cases of this new feature, such as this one by Kane Snyder, or this mind-blowing presentation done by Owen Auger for Power BI UG Barcelona.
Game changer!
How many times you’ve heard this during Power BI evolution? If you ask me, at least 30 features were considered as something that will truly change the way we are doing things in Power BI. However, not all of them live up to their high expectations. Reasons are different, of course, but let’s be honest and admit that most of these features were just a nice addition – nothing more, nothing less.
With Field Params, I’m pretty sure, it’s different. Not just because they eliminate the necessity of applying various workarounds. They also open a whole new world of possibilities, not just from a data visualization perspective, but also, and what is even more important in my opinion, from a data modeling point of view.
But, before being able to get the maximum from Field Params, we need to make ourselves familiar with this feature, right?
Creating a Field parameter
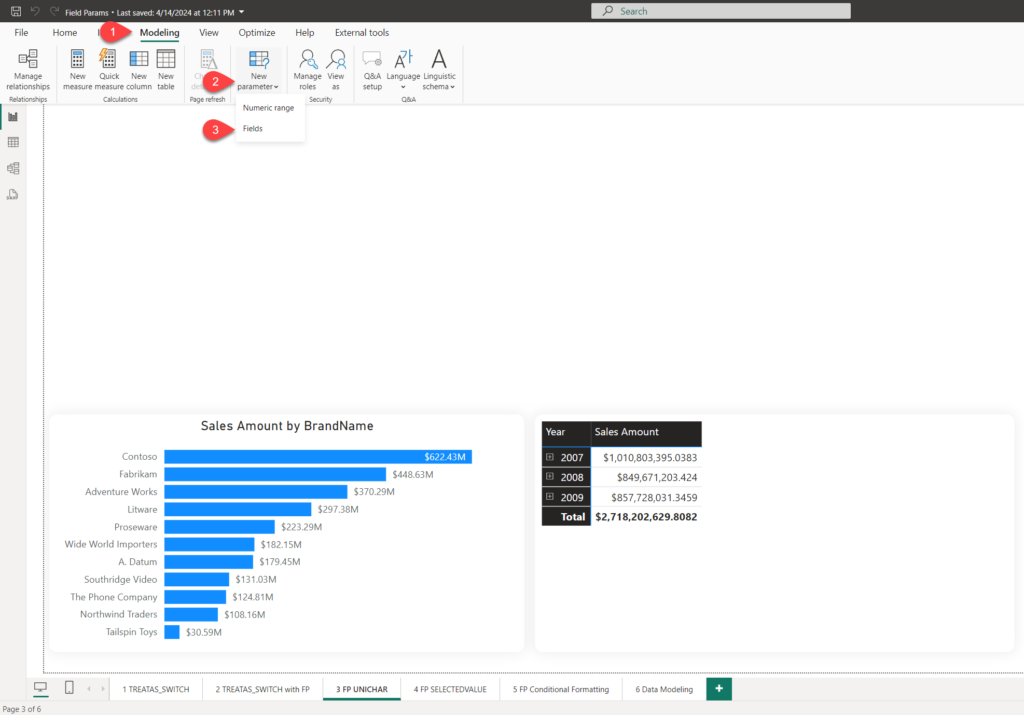
Creating a new Field parameter is a fairly straightforward process:

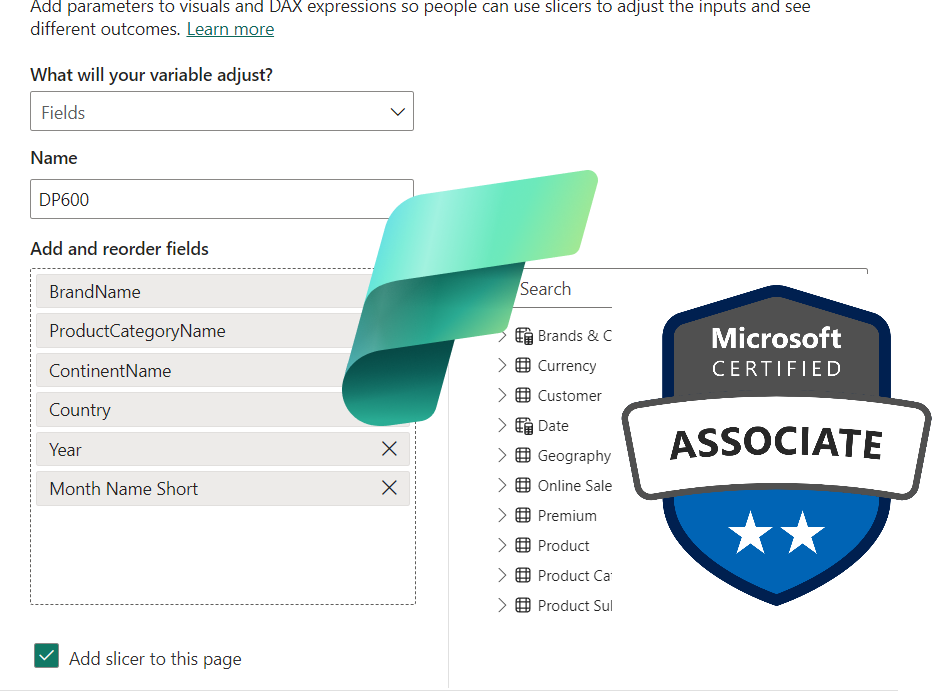
Then, in the dialog window, simply choose the fields you want included in the FIeld parameter:

Once you have your Field parameter ready, you have to change the field within the visual, so that the static value (in my case the value from the BrandName column) is replaced with the Field parameter:

From there, dynamically switching the fields on the Y-axis is one click away!
Same way, instead of columns, you can use measures as Field parameter, and dynamically switch between different KPIs within the same visual.
What happens behind the scenes?
In a nutshell, Field params enable you to perform two actions:
- Dynamically change the attribute for slicing and dicing the data in the visual – meaning, dynamically switch between different columns
- Dynamically change the metrics displayed in the visual – meaning, dynamically switch between different measures

I hear you, I hear you…Nikola, we could have done this prior to Field Params as well…Yes, that’s true, but instead of TREATAS complexity, or writing complex and verbose SWITCH statements in DAX, you can now set everything up with just a few clicks, and without writing a single line of DAX code!
Let’s have a quick look under the hood of Field Params creation.
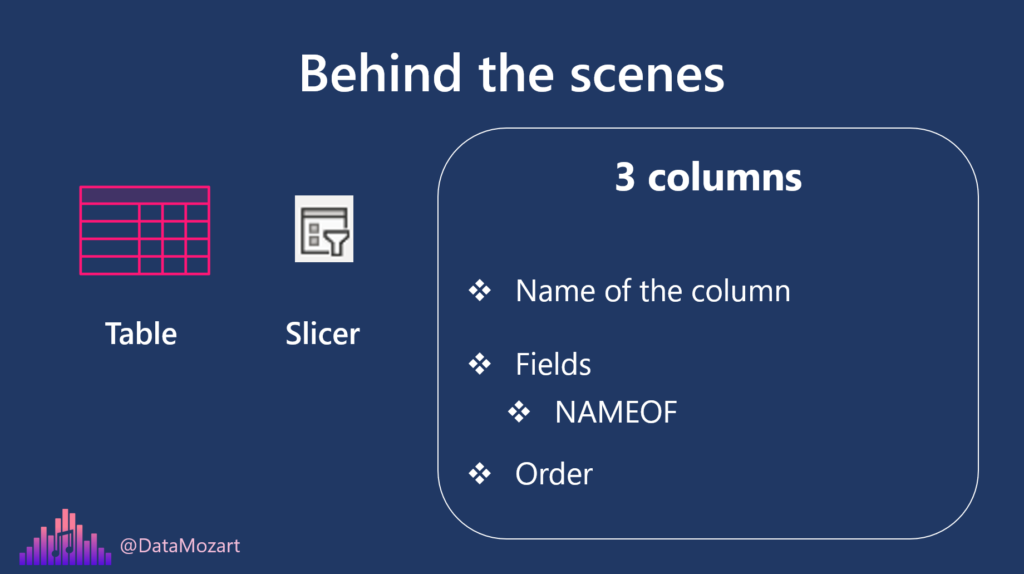
Once you drag the columns and/or measures in the Field Params window, Power BI will automatically create a new table in your data model. You may also choose to automatically create a slicer containing values from the Field Params and put it on the report page.
This table consists of three built-in columns – one is visible to an end-user, while the remaining two are hidden by default.
The first one, the name of the column that’s going to be displayed in the slicer, is the label exposed to a consumer. You can change the name of the column later, without the need to change the whole logic in the background.
This is possible because of the second column in the table, called Fields. This column leverages the NAMEOF DAX function. The NAMEOF function returns the fully qualified name of the model object. Why is this important? Let’s say that you want to change the column name from Brand to Brand name…You can do that without violating the Fields Param structure, as the NAMEOF function will still return the new name of the object. The displayed name stays unchanged, but it will refer to an underlying object with a different name.
The third column is a numeric one and represents the order of the elements within Fields Params, starting from 0.

Ok, these 3 are provided out-of-the-box once you create Field Params. However, as this is nothing else but the table, you can also manually extend this table with additional columns, as described here.
Considerations and limitations
I guess we are all super excited about Field Params and thinking about an infinite number of use cases in our Power BI solutions.
However, there are certain limitations and considerations to be aware of.
The first question that pops up is regarding the performance.
And I’ll immediately tell you that there is no performance difference between using Field Params and a regular column – because once the Power BI retrieves the list of the columns from the Field Params table, it will use regular columns in the query.
Let’s now examine the limitations of this feature. First of all, if you are using the “Analyze in Excel” feature, at this point in time you can forget about taking advantage of the Field Params feature. Since Excel uses MDX to populate pivot tables, it’s not even aware of Field Params. I’d say that this is currently the biggest limitation of the Field Params feature.
Additionally, AI visuals and Q&A feature are currently not supported, as well as implementation in pure Live connection models.
Conclusion
Field parameters is one of those features you simply know will have a huge impact! Not just because it opens up literally an indefinite number of possible use cases, but also because of easy implementation and potentially extended customizations to answer business questions in a more efficient way.
Thanks for reading!
Last Updated on June 3, 2024 by Nikola


