

TIQ stands for Time Intelligence Quotient. As “regular” intelligence is usually being measured as IQ, and Time Intelligence is one of the most important topics in data modeling, I decided to start a blog series which will introduce some basic concepts, pros and cons of specific solutions and potential pitfalls to avoid, everything in order to increase your overall TIQ and make your models more robust, scalable and flexible in terms of time analysis
- TIQ Part 1 – How to destroy your Power BI model with Auto Date/Time
- TIQ Part 2 – Your Majesty: Date Dimension
After explaining why using Auto Date/Time feature in Power BI is a legitimate, but not desirable solution for handling dates in your data model in the first part of this series, and emphasizing the importance of Date dimension within the Star schema in the second part, in this part, you will find various solutions to creating a proper Date dimension in your data model.
Solution #1: SQL
In most cases, if you are connecting to a relational data sources, such as SQL Server, Oracle, or MySQL, there is a big possibility that your data model which resides in the data warehouse already contains Date dimension.
In this scenario, you simply import existing Date dimension into Power BI data model and you’re good to go. This approach brings the benefits of securing a single source of truth regarding time handling on the organizational level.
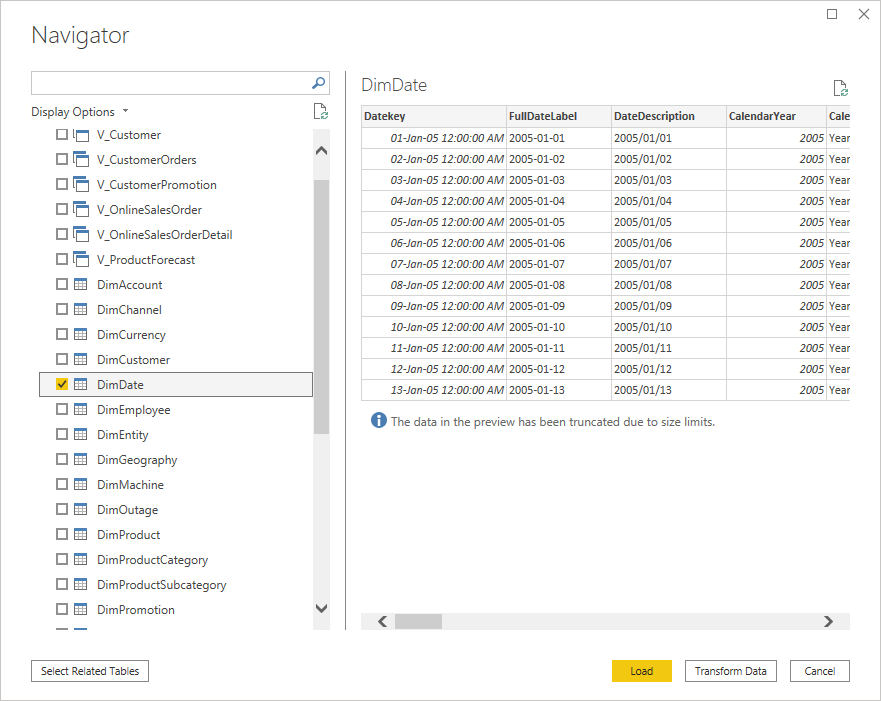
Let’s say I’m connecting to a Contoso SQL Server database, which holds data about sales for an imaginary company called Contoso. Once I select Get Data within Power BI and connect to the Contoso database, the only thing I need to do is to select DimDate table (among others that I need) and I have a proper Date dimension within my Power BI data model!
That’s the easiest and most frequently used way of handling time within your Power BI data model.
In case that, for any reason, your data warehouse doesn’t have date dimension (honestly, you have more chances to get hit by the truck than to find data warehouse without date dimension), you can create one on your own. There are multiple ready-made solutions on the web, such as this one by Aaron Bertrand, so in case you need it for any reason, a calendar table using SQL can be created in a few minutes.
Solution #2: M (Power Query)
If you don’t have an existing date dimension to import into your data model, you can quick and easily create brand new date dimension using Power Query and its M language.
As I’ve already mentioned in one of the previous articles, related to various Power Query tips, there are dozen of out-of-the-box solutions on the web. I’ve chosen this one from Reza Rad.
Here are the step-by-step instructions on how to create Date dimension using M language. Open new Power BI file and choose Blank query under Get data:

If you want to create highly flexible and customized Date dimension, you should take advantage of using parameters. Therefore, under Manage Parameters, select New Parameter and set it like follows:
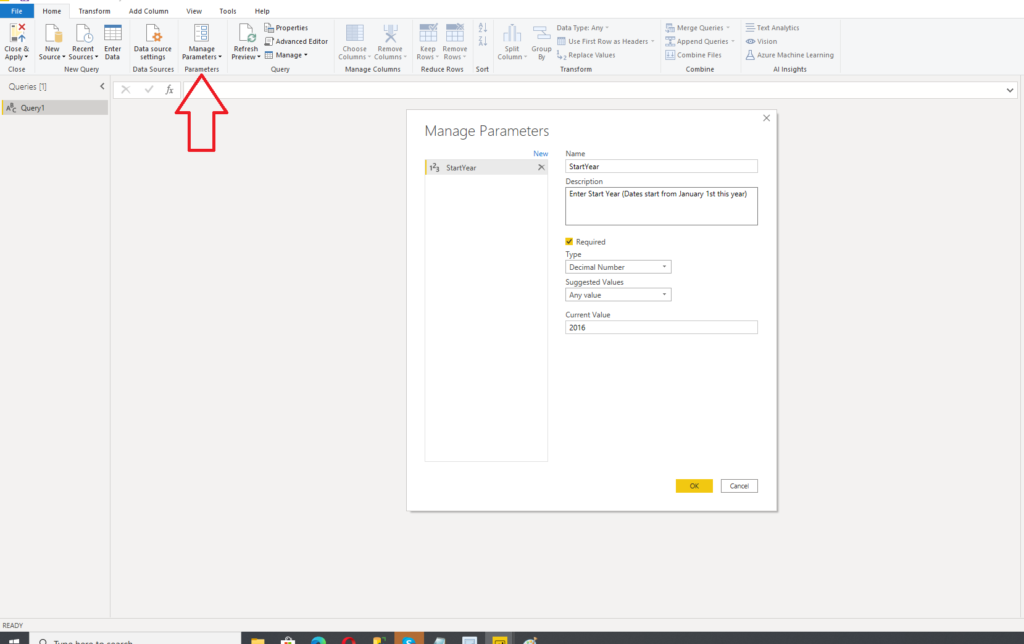
After you defined start year of your Date dimension, apply same steps for end year:

As soon as you done with that, open Advanced Editor and paste following script:
let
    StartDate = #date(StartYear,1,1),
    EndDate = #date(EndYear,12,31),
    NumberOfDays = Duration.Days( EndDate - StartDate ),
    Dates = List.Dates(StartDate, NumberOfDays+1, #duration(1,0,0,0)),
    #"Converted to Table" = Table.FromList(Dates, Splitter.SplitByNothing(), null, null, ExtraValues.Error),
    #"Renamed Columns" = Table.RenameColumns(#"Converted to Table",{{"Column1", "FullDateAlternateKey"}}),
    #"Changed Type" = Table.TransformColumnTypes(#"Renamed Columns",{{"FullDateAlternateKey", type date}}),
    #"Inserted Year" = Table.AddColumn(#"Changed Type", "Year", each Date.Year([FullDateAlternateKey]), type number),
    #"Inserted Month" = Table.AddColumn(#"Inserted Year", "Month", each Date.Month([FullDateAlternateKey]), type number),
    #"Inserted Month Name" = Table.AddColumn(#"Inserted Month", "Month Name", each Date.MonthName([FullDateAlternateKey]), type text),
    #"Inserted Quarter" = Table.AddColumn(#"Inserted Month Name", "Quarter", each Date.QuarterOfYear([FullDateAlternateKey]), type number),
    #"Inserted Week of Year" = Table.AddColumn(#"Inserted Quarter", "Week of Year", each Date.WeekOfYear([FullDateAlternateKey]), type number),
    #"Inserted Week of Month" = Table.AddColumn(#"Inserted Week of Year", "Week of Month", each Date.WeekOfMonth([FullDateAlternateKey]), type number),
    #"Inserted Day" = Table.AddColumn(#"Inserted Week of Month", "Day", each Date.Day([FullDateAlternateKey]), type number),
    #"Inserted Day of Week" = Table.AddColumn(#"Inserted Day", "Day of Week", each Date.DayOfWeek([FullDateAlternateKey]), type number),
    #"Inserted Day of Year" = Table.AddColumn(#"Inserted Day of Week", "Day of Year", each Date.DayOfYear([FullDateAlternateKey]), type number),
    #"Inserted Day Name" = Table.AddColumn(#"Inserted Day of Year", "Day Name", each Date.DayOfWeekName([FullDateAlternateKey]), type text)
in
    #"Inserted Day Name"
Once you’re done with that, hit Close&Apply and you have fully functional Date dimension in your data model! Additionally, if you save your file as .pbit (Power BI template file), you can easily change time period for which you want to generate your dates.
As you may have noticed, you are just defining start and end year of your desired date dimension, and M takes care of handling everything else – how cool is that!
Solution #3: DAX
Finally, if you prefer using DAX for your Power BI calculations, you can also use it to create a proper Date dimension. DAX has built-in functions CALENDAR() and CALENDARAUTO(), which will lay the ground for other necessary attributes, such as weeks, working days, etc.
Before I guide you where to find the best DAX script for creating the Date dimension, I just wanted to suggest avoiding usage of CALENDARAUTO() function in most cases, since it takes earliest date value from your whole data model and expands until the latest date from your whole data model!
That could work fine in some limited number of cases, but in many real-life scenarios, such as when you import data about the customers, there are records where we don’t know the correct birth date of the customer. Then, someone inserts default value January 1st 1900, and all of a sudden your date dimension in the Power BI model would start from 1900 in case you opt to use CALENDARAUTO() function!
Key takeaway from here – you need to leverage handling of specific scenarios and don’t let Power BI mess around with your data model. Keep in mind that you are the boss of your data model!
As I promised above, if you decide to use DAX for creating the Date dimension, don’t look any further and use this solution from DAX gurus Marco Russo and Alberto Ferrari.
Key Ingredient – Mark your Date dimension as a Date table
Whatever solution you choose for creating Date dimension (SQL, M or DAX), don’t forget the most important thing – mark this table as a date table! This will enable you to use your Date dimension in its full capacity, performing all powerful DAX time intelligence functions without worrying about the results and performance.
In order to be marked as Date table, a table, or better to say a column which will be marked, must satisfy few conditions:
- Contains unique values in every single row
- NULL values are not allowed
- Contains contiguous dates (no gaps are allowed)
- Must be of Date data type
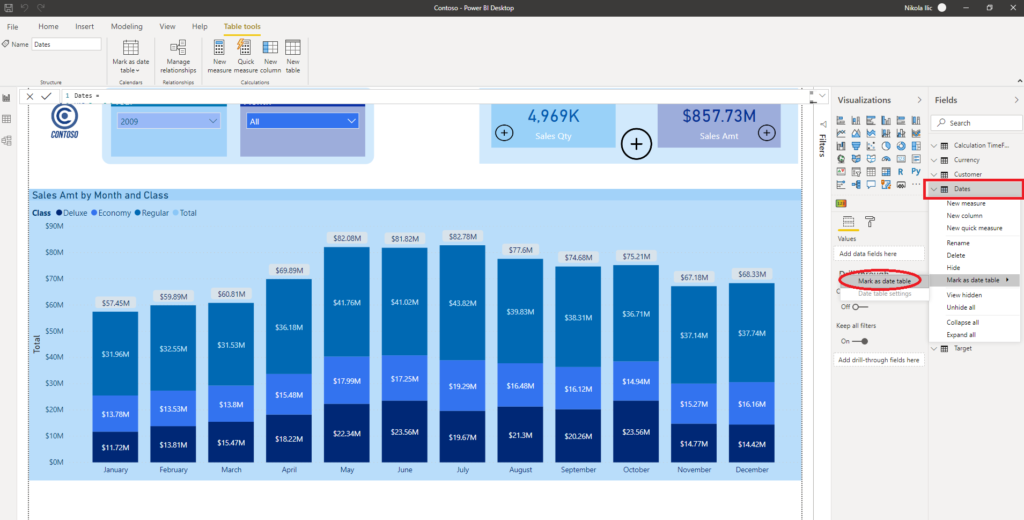
Let’s see how we mark the table as a Date table in few clicks. Right-click on your Date dimension, hover over Mark as date table option and click on Mark as date table:
A dialog box should open and Power BI will offer you to select on which column you want to apply the marking:

Power BI will automatically recognize columns of proper data type and once you choose the column, Power BI will perform validation and inform you if the selected column was validated successfully.
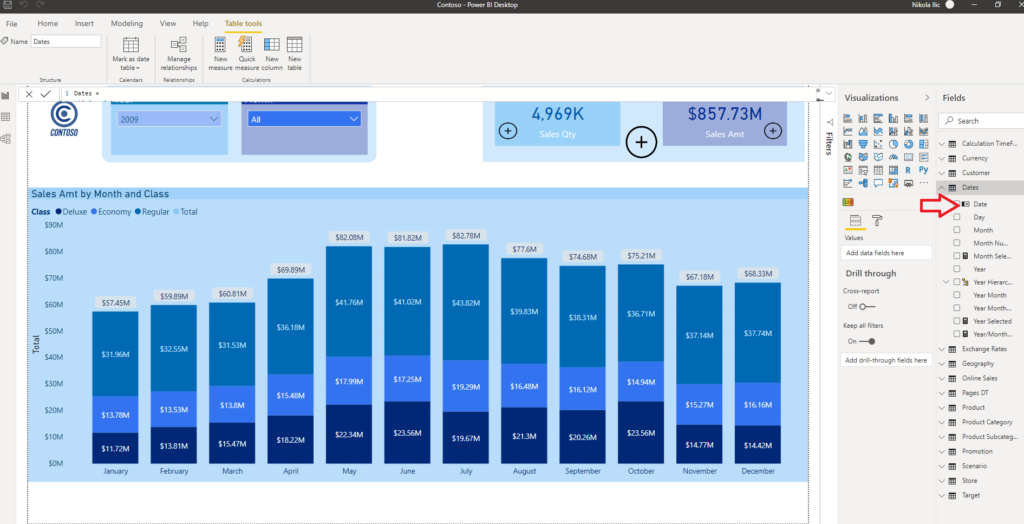
If everything went fine, you should see a small icon next to the Date column name:
Congratulations! You’ve just completed all necessary steps for creating proper and fully functional Date dimension in your data model.
As we now laid the ground for manipulating data using various time periods, in the next part of this series I will write about the most important Time intelligence functions in DAX and how you can use them to leverage different real-life scenarios.
Last Updated on July 4, 2020 by Nikola


mobile legends hacks
You really make it seem really easy with your presentation however I to find this topic to be really
something which I believe I might never understand. It seems too complicated and very huge for me.
I am looking ahead for your next submit, I’ll attempt
to get the grasp of it!
Nikola
Thanks! It’s really not that hard, just try to understand general data modeling principles (Kimball methodology): After that, I’m sure you will get to grasp with specific related topics.
Nikola
Thanks Jolie, great to hear that!