If you’re a data engineer, analytics engineer, or a Microsoft Fabric administrator, or if you consider taking the DP-700 (Microsoft Fabric Data Engineer) exam, there’s one thing you should know at the very beginning: Spark settings in Fabric aren’t just technical fine print—they’re your ticket to immortality when it comes to Spark performance!
In this article, I’ll walk you through how to go from out-of-the-box default Spark configurations to a fine-tuned setup that suits your specific workloads and requirements, as well as getting you ready for the DP-700 exam.
Spark is an extremely powerful engine, but like any powerful tool, it runs best when you tune it. So, don’t always settle for default. Get dynamic—and get Spark working the way you need it to.
This article may help you understand topics relevant for the DP-700 (Fabric Data Engineer) exam
What is Spark?
Before we dive into explaining individual Spark settings, let’s take one step back and explain what Spark is. Of course, Spark is a complex engine, so I’ll try to keep it as simple as possible and introduce Spark on a very high-level – otherwise, I could easily end up writing a book:)
In a nutshell, Apache Spark is an analytics engine suitable for large-scale data processing, providing numerous built-in modules for SQL, streaming, machine learning, and many more. It also supports various programming languages, such as Java, Scala, Python, SparkSQL, and R. However, the key characteristic of Spark is that it’s a distributed system – this means, each Spark cluster represents a multi-node architecture, where one node (Driver node) coordinates the task execution, whereas multiple Worker nodes perform the real work, as displayed in the following illustration:

There are a few important things to keep in mind:
- A single Spark cluster may have one Driver and multiple Worker nodes
- Each Worker (Executor) node gets its own set of resources: CPU, memory, etc.
- Executors are created as soon as the Spark job starts, and removed as soon as it ends
- Each CPU core allocated to an Executor performs only a single task. This means, if an Excecutor gets 4 cores with one slot per core, it can run 4 tasks in parallel
Fine, now that we know how Spark works in general, let’s examine the node sizes available in Microsoft Fabric. There are 5 available options:
- Small (S) – 4 vCores, 32 GB of memory
- Medium (M) – 8 vCores, 64 GB of memory
- Large (L) – 16 vCores, 128 GB of memory
- X-Large (XL) – 32 vCores, 256 GB of memory
- XX-Large (XXL) – 64 vCores, 512 GB of memory
So, how should you configure Spark settings in the Fabric workspace? Again, you need to wait for the answer a little bit:) First, we need to explain two core concepts related to Spark, as these two are essentially the main properties to customize when configuring Spark settings.
Autoscale
Autoscale represents the capability to scale the amount of compute resources up and down, based on the amount of activity. Depending on the specific workload requirements, you can define the minimum and maximum number of nodes to be used.
Dynamic allocation
In some circumstances, Spark may request more Executor nodes if the tasks exceed the load that current executor nodes can handle. It is fairly complicated to define the static number of Executors, because the Spark job execution process may be like a rollercoaster:) With dynamic allocation enabled, the Spark pool will automatically allocate executors based on the processing requirements and based on the nodes available in the Spark pool.
Spark Workspace Settings – Pool
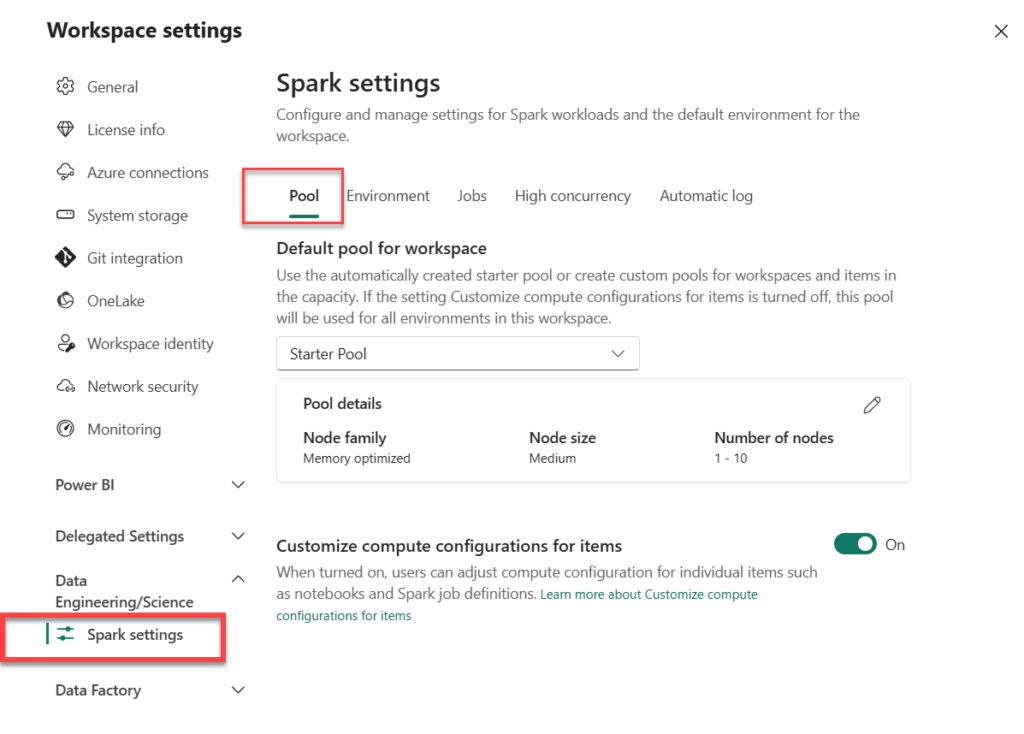
Once you navigate to the workspace settings, the Spark settings can be found under the Data Engineering/Science tab in the menu on the left:
There are two types of Spark pools – Starter pool and Custom pools. Let’s quickly examine both of these.
You need a workspace admin role to be able to configure and customize a starter pool and/or create custom Spark pools. Additionally, for Custom pools, Fabric capacity admin must enable the Customized workspace pools in the Capacity settings of the Admin portal
Starter pool
Starter pools are provided out-of-the-box and represent a quick and easy way to perform various Spark tasks in Microsoft Fabric. The idea behind the Starter pool is to quickly get up and running, as Starter pools have Spark clusters that are always on, so you don’t need to wait for Spark to set up the nodes for you. The Starter pool comes with a predefined Medium node size, and you can’t modify that, but you have the possibility to adjust the Autoscale and Dynamic executor allocation properties – although you can’t disable them completely (you can only specify the number of nodes and executors).
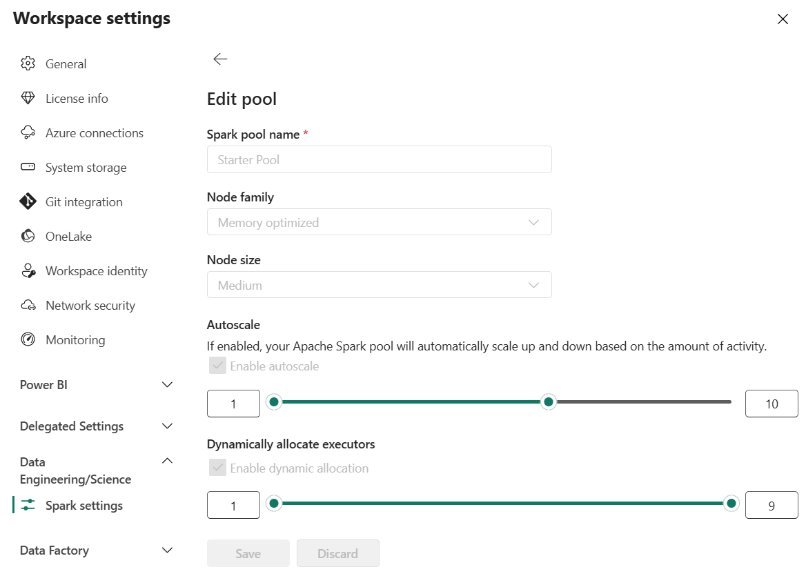
Custom pools
As their name suggests, Custom pools allow YOU to be in charge and determine the execution of the Spark workloads in Microsoft Fabric capacity. Here, you can customize the node size and choose to use, let’s say, a Large instead of a Medium size. You can also completely disable the Autoscale and/or Dynamic executor allocation if needed:

Unlike the Starter pool, where the Spark cluster is readily waiting in the background for your tasks and needs only a few seconds to start a Spark session, Custom pools require a longer time to spin up (usually between 2 and 3 minutes). Once you create a Custom pool, all notebooks in the workspace will, by default, use that pool.
There is an additional setting, Customize compute configuration for items (enabled by default), which allows users to configure compute resources on a session level for individual items, such as notebooks or Spark job definitions, by using the Environment item (we will examine this item in one of the following sections).
If you are wondering how much “power” you get for your Spark workloads, according to the official documentation, the formula looks like this:
2 Spark vCores per CU x 3 as a bursting multiplier
To translate this into regular language:
- F2 = 12 vCores (2 x 2 x 3)
- F8 = 48 vCores (8 x 2 x 3)
- F64 = 384 vCores (64 x 2 x 3)
- …and so on
If you are not sure what bursting is, I get you covered in this article.
Let’s conclude this section by trying to provide an answer to a question: when should I use a Starter vs. Custom Spark pool? Obviously, it depends on numerous factors, such as the size of the data that needs to be processed, concurrency level, spikes required for completing certain tasks, and diversity of workloads – think of different requirements from data engineers versus data scientists, for example.
However, in the end, it boils down to choosing between flexibility (Custom pools) and commodity (Starter pool). Also, it depends on your level of Spark skills and knowledge, because sometimes it makes more sense to leave the workload balance determined by the preconfigured Starter pool, than potentially running into issues by configuring the Custom pool inappropriately.
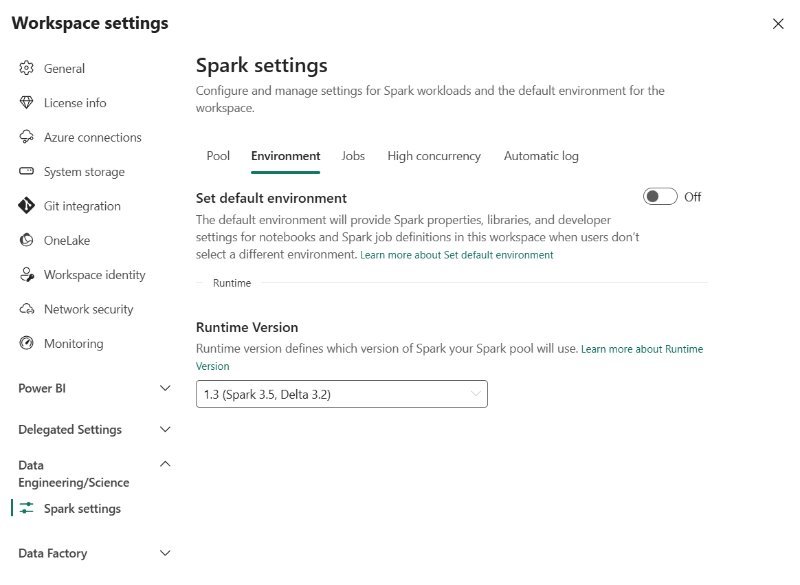
Spark Workspace Settings – Environment
Before we explore the Environment workspace settings, let’s first define what an Environment is. It’s a special Fabric item that contains a collection of various configuration settings for running Spark tasks. These configuration settings are compute properties, runtime version, library packages, and so on. So, think of all these properties you include and create a bundle. Then, this bundle is published to a Fabric workspace as an individual item and can be shared across multiple users and workloads. Additionally, it can also be part of the Git integration process.
The main benefit of creating multiple environments is that you may implement more granular control over the execution of the individual Spark workloads. Think of having two notebooks, and each of the notebooks requires a certain set of configuration properties. You can run each notebook in the context of different environment:

Within the environment, you can configure various properties – such as the Spark pool used for the environment (displayed in the illustration below), Spark properties, libraries, etc.

Spark Workspace Settings – Jobs
Here, you can configure the Spark job admission logic.

By default, all workspaces will apply so-called optimistic job admission. What on Earth is the optimistic job admission?! Simply said, when you submit a Spark job for execution, this job will be evaluated based on the number of available cores, and will be executed with the minimum number of cores. During the execution, scale-up requests will be allowed if total Spark cores are within the capacity limits.
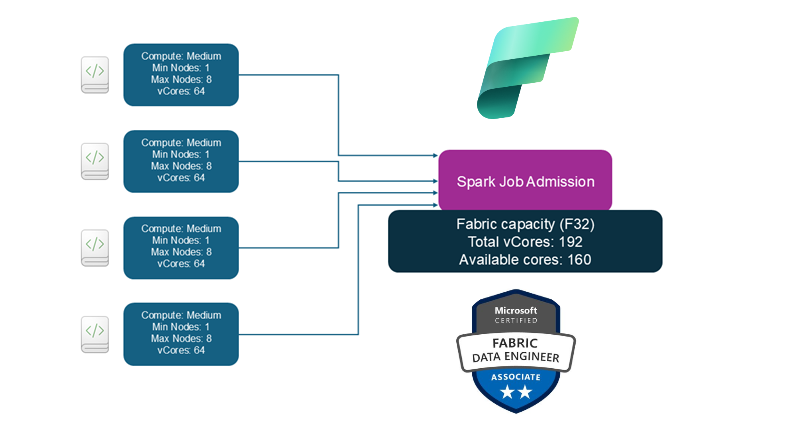
To illustrate, this is what is going to happen with the optimistic job admission approach in place:

Each of these four jobs is admitted with 1 node, and scale up requests are approved or rejected based on available vCores. With Autoscale enabled, the F32 SKU can support 24 concurrent jobs (8vCores/job). If the new jobs are admitted and there are no available vCores, they will be queued or throttled.
What happens if you turn off the optimistic job admission, or, to be more precise, when you enable the setting Reserve maximum cores for active Spark jobs? In this case, total cores required for a job are kept reserved during the job admission. This means, if the jobs are exceeding the number of available cores, they will be throttled, as displayed in the following illustration:

Spark Workspace Settings – High concurrency
The core idea behind the High concurrency setting is to allow multiple users to share the same Spark session. In simple words, multiple users running multiple notebooks in parallel, may take advantage of running these notebooks in the scope of the single Spark session.
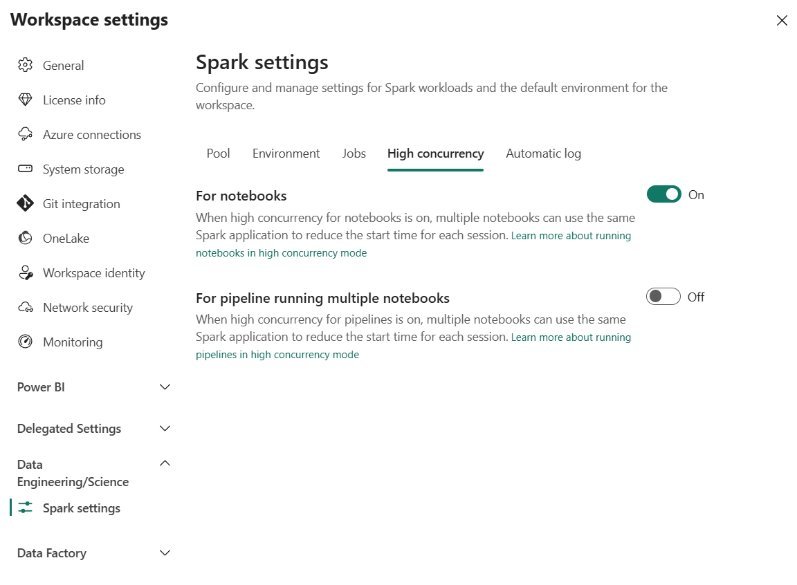
As you may see in the illustration above, High concurrency mode may be enabled for running notebooks from the Fabric pipeline. If you don’t enable this setting, each notebook executed in the Fabric pipeline will initiate a separate Spark session. This is usually not the most efficient way of utilizing resources, as you may probably want to run multiple notebooks in the context of the same session. To achieve that, simply enable this setting For pipeline running multiple notebooks, AND configure the session tag property in the notebook activity in the pipeline itself (more on that in one of the following articles).
There are numerous benefits of using High concurrency mode:
- Users may switch between the notebooks without delays (no need to initialize the new session)
- Cost efficiency – only the initiating session is billed, whereas all the subsequent tasks that share the same session are not billed
However, there are also certain prerequisites for session sharing:
- The session must be within a single user boundary
- Sessions must have the same default lakehouse configuration
- Sessions must have the same Spark compute properties
Spark Workspace Settings – Automatic log
Automatic log is the setting relevant to machine learning models and experiments. By default, it will capture the values of input parameters, output metrics, and output items of the machine learning model during the process of machine learning model training.

Conclusion
Understanding the way the Spark engine works is of paramount importance for implementing scalable and robust workloads in Microsoft Fabric. And, although Fabric default configuration provides you with a solid starting point, there are many nuances and additional configuration settings you might consider when tuning your Spark workloads.
To better understand how many of these settings affect performance in real-life scenarios, I strongly recommend reading the amazing series of blog posts from my fellow MVP, Just Blindbæk:
- Fabric Spark notebooks and CU consumption
- Running multiple Spark notebooks on the same capacity
- Optimizing Fabric Spark with High concurrency mode
Thanks for reading!
Last Updated on April 14, 2025 by Nikola